DETERMINATION OF DEFORMING FORCES AND DEFORMATION DEGREE DURING METAL FORMING
Purpose of the work: to study the methods of deforming force and deformation degree determination for several kinds of metal forming; to understand the essence of drawing and pressing processes; to become acquainted with the equipment and tools employed; to establish a relationship between deforming force and deformation degree. Theory. The necessary condition for metal forming process is the proper plasticity possessed by a material, i.e. the ability to be deformed under an external load without failure. Plasticity of any material is limited and primarily depends upon the deforming scheme (scheme of stress condition, at first), chemical content and structure of a deformed metal, temperature and deforming rate. The term "deformation degree" has been introduced into metal forming practice; it represents relative change in cross-sectional area or linear dimensions of a billet. Before deformation degree determination one must proceed from the volume constancy law. The condition of volume constancy applied to a prism with 90-degree angles and dimensions before deforming H, B, L and after it, correspondently, – h, b, 1 may be expressed as follows: HBL = hbl. Hence, the deformation degree (coefficient of decrease in height): g= H/h = bl/BL. Each forming method is characterized by the peculiar loading scheme and billet deforming scheme. Therefore the calculating dependences for deformation degree and deforming force determination are quite different.
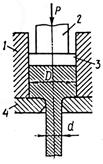
Pressing. During pressing (Fig 4.1), metal is extruded from a container through a die orifice which is so shaped as to impart the required form to the product. Essentially the process is one by which a block of solid metal is converted into a continuous length of uniform cross-section by forcing it to flow under high pressure. Metal undergoes uniform squeezing and, therefore, acquires high plasticity. Hence, pressing is available for alloys of low plasticity. Deformation degree in pressing is measured by reduction and extension coefficients (percentage), based on the cross-sectional areas of the container (FC) and the die aperture (Fd):
Direct pressing-force is determined by the Unksovs formula:
where L is length of a billet at the instant of its egress from die orifice, m; D is container diameter, m; d is diameter of cylindric part of die orifice, m;
1 is length of cylindric part of die orifice, m; f is friction coefficient; sy is yield point of a material, MPa.
Drawing (Fig. 4.2) is the process in which a billet is pulled through a reducing die to be decreased in cross-sectional area. Procedure is usually executed without heating, providing, therefore, high surface quality and dimensional accuracy to be obtained. Drawing is the unique process to produce thin (capillary) pipes and a wire of at least 0.002 mm in diameter. Deformation degree after drawing is also measured by extension and reduction coefficients:
where L, l is length of a billet and a product correspondent; Fb, Fp is cross-sectional area of a billet and a product correspondently.
Fig. 4.1. Principle of direct pressing: Fig. 4.2. Principle of drawing 1 – container; 2 – ram; 3 – press-spacer; 4 – die
Drawing force for continuous rod may be determined by Perlin's formula:
where sy is yield point average value in nucleation site of deformation, MPa; sq is inverted-stretch stress, MPa; f is friction coefficient; a1 is transformed angle of deformation cone, a1 is arctg((D-d)/2lS)=arctg ((D-d)tga/(2l2tga+D+d)), lS=l1+l2; l1, l2 – length of deformation zone in cone part of reducing die and length of calibrative belt respectively, m (Fig. 4.3); a is angle between the axis of a rod and formative line of reducing die cone deforming zone, rad (Fig. 4.3).
Fig. 4.3. Dimensions of reducing die
Forging. During forging, a billet is deformed by block heads (or other tools) impacting its different parts. The method is characterized by low productivity and rather low dimensional accuracy of products. Nevertheless, it offers shaped -forgings of various mass (from hundreds of grams to 250 tons) to be manufactured. Flow of metal has some peculiarities in each forging operation, so the dependences for deformation degree determination is different in each case. Deformation in upsetting is determined by the formula: U=Fp/Fb where Fp, Fb – cross-sectional area of a billet before and after deformation correspondently.
|

 .
.
 a is apex angle of die cone, rad;


